So Facebook may be changing things. Again. Like always.
This is what they do best really. Release something, let us get used to it, and then make a whop of changes to it.
There was recently a number of changes to their news feed algorithm, edgerank, making it more difficult for your fans to see your content. Just because someone ‘Likes’ your Facebook page, does not mean they will see your content in their news feeds.
This all being said, it did put more onus on the page creator/business/blogger, to create more worthy content. It was quickly realized that the more a fan engages with a page, the more they will see that page’s updates in their news feed.
Bottom line, as with everything in social media, give your fans/readers/followers/etc something worth engaging with. Put simply, create great content.
Now rumour has it that the algorithm may be changing again, and making it more difficult to see content from the pages that you have liked or for the page creator to have their content seen, unless the page owner is willing to pay a premium. This may just be a nasty rumour, but it does highlight the fact that unless I interact with a page often, I don’t always see their updates.
This is an issue for me because I rely on my news feed to stay up to date with many of my favoutire bloggers, politicians and organizations. It is also a problem because I run a Facebook page for this blog (*shamless plug*).
With this new whisper of change on the horizon, I decided to utilize a tool that Facebook rolled out this past March, Interest Lists. This is a somewhat similar concept to Twitter Lists or Google+ Circles, in the respect that it lets you categorize pages you “Like” into specific interests to follow.
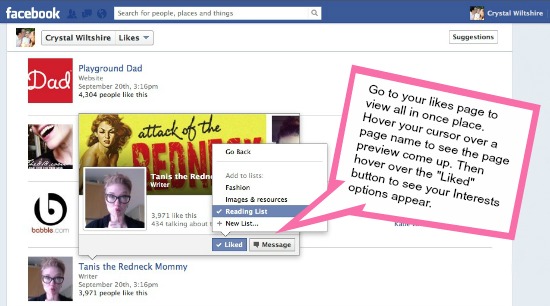
Using your Interest Lists, you can sort your favourite pages and use it as a way to ensure that you never miss out on their information. My first order of business was to create myself a “Reading List” interest and promptly add all my favourite bloggers to it.
Step one in this process would be to create all of your ‘Interests’ in Facebook, so that they will be readily available when you go to add each page.
Next, to add each page to the Interests you have created, you can visit the page and hover over the “Liked” page to see the menu appear – after approximately 5 pages, I realized this could not possibly be the most time-efficient way to do this. I headed to my list of “Likes” from my profile and completed the task in a lot less time.
Once you have added your selected pages, you will be able to quickly select the interest from the left hand side of your news feed to see all the updates from only those pages.
*Update:
Since first starting this post last week, I attended BlissDom Canada, where I had the opportunity to listen to popular social media strategist, Amber Mac. During the Q&A of her keynote, a fellow blogger addressed this topic and asked her advice. Amber explained that her method is to simply create a regular user account that she uses solely for business. She has no pictures of her family or personal information, but it is a regular account with which other Facebook users can subscribe and interact with. This is a really great option for anyone who doesn’t mind running a second profile (assuming you also intend to keep your personal one) because it does allow you a much more friendship style connection with your fans that a basic Facebook Page.
Ideally speaking, the world’s largest social network would just have their crap organized from the start. Since we all know that’s not the case, we’ll just have to work through it together. One million changes at a time…


Hi there, great post on Interest Lists! I’ve just started a Facebook Interest List for Canadian only bloggers and it’s here: https://www.facebook.com/lists/361754750580998. We also have a Group attached to that and it’s here: https://www.facebook.com/groups/CanadianBloggers/ where we can chat bloggy stuff. You can request a membership to the Group to get in. Hope to see you there!
Awesome, thank you! I will definitely check it out.